WAI Docs Wed Aug 19 13:22:37 EDT 2026
List
Quick Start
Quick Start
User Guide
User Guide
Policies - GuardRails
Policies - GuardRails
Witness Anywhere: Remote Device Security
Witness Anywhere: Remote Device Security
Witness Attack
Witness Attack
Administrator Guide
Administrator Guide
404
404
Deploying on Windows with Group Policy
Deployment Overview
- Prerequisite: Creation of Device Organizational Unit (OU)
- A dedicated Device Security Group should be created by the Windows Administrator. This group will contain all user devices intended for PAC distribution.
- GPO Deployment for Registration Script
- The PAC Registration Script will be pushed to the devices through Group Policy Objects (GPO) as a Scheduled Task.
- The script will run when the system restarts, ensuring that the necessary operations are performed with administrator privileges.
- Administrative Privileges Requirement
- The Registration Script requires administrator privileges to import the CA Certificate and to read/write registry keys.
- This necessitates that the script runs under the System account during startup.
- GPO Application to the Device Organizational Unit (OU)
- The Registration Script GPO will be applied specifically to the Device Security Group created earlier.
- The script will execute the next time any device in the Security Group restarts, ensuring proper registration and PAC enforcement.
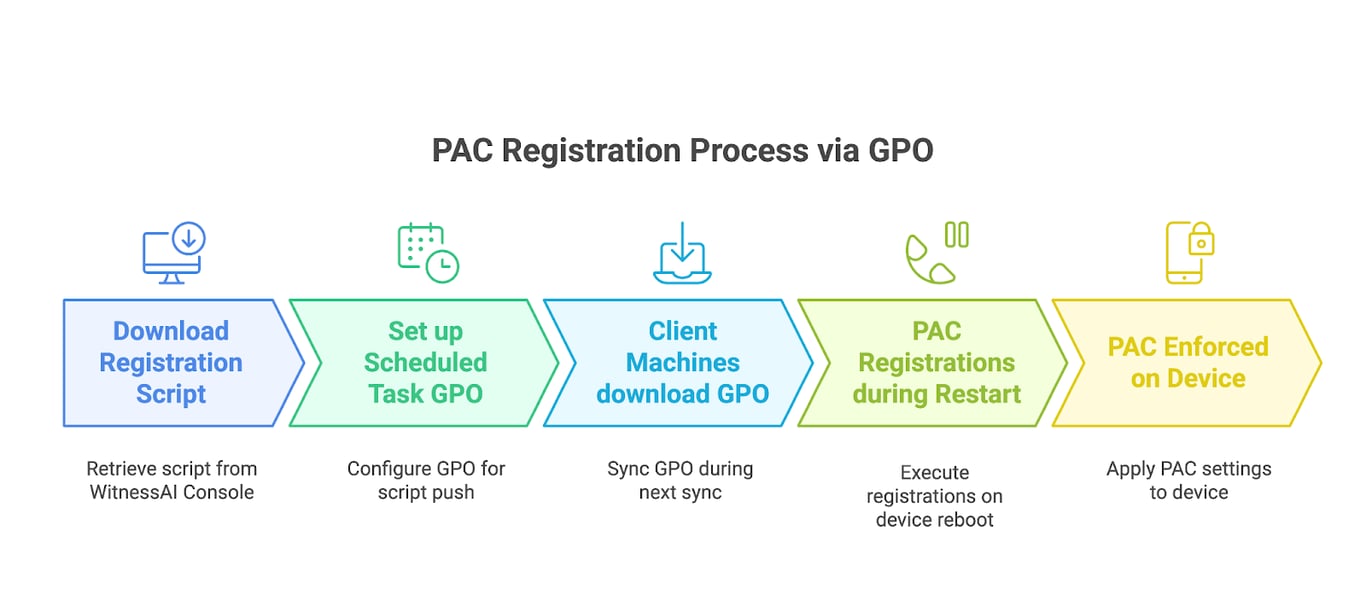
Detailed Solution Workflow
Step | Action | Outcome/Purpose |
1 | Download ZIP (Registration and Flush Script) from WitnessAI Console. | Obtain necessary files for device registration and proxy setup. ZIP file containing the registration and flush script is downloaded. |
2 | Create a Security Group for Pushing the Registration Script | A security group containing the devices intended for PAC distribution is created. |
3 | Place the registration and Flush Script in a Network share accessible by the client machines. | Scripts are placed in a Network share path accessible by the client machines. Ex: SysVol Path |
4 | Create a GPO for pushing the registration script and creating a scheduled task to run the registration script at startup. | Scheduled Task GPO created with Scope assigned to the Security Group created in Step 2. |
5 | GPO gets downloaded by the devices in scope during the next group policy update. | PAC Registration GPO gets downloaded by the client machine. |
6 | The registration script runs on the next device restart. | PAC registration should happen during next restart and logs will be stored at C:\Windows\Temp\pac-registration-log.txt |
7 | PAC Configuration Enforced and Registry Keys created. | PAC Registration is completed and configuration is enforced. |
Configuration Guide
Scheduled Task - Method
Note: This method relies on copying the registration script to C:\Windows\Temp\path on the local machine using GPO and then triggering that script at device startup using Task Scheduler.
This method ensures that the script run happens even when the client machine is unable to connect to the Domain Controller.
- Create a Security Group which contains all the devices intended for PAC distribution.
- Open Active Directory Users and Computers.
- Right-click the desired OU or container, select New > Group.
- Name the group (1) (ex: "WitnessAI-PAC-Devices").
- Set Group Scope to Global (2) and Group Type to Security (3).
- Click Ok
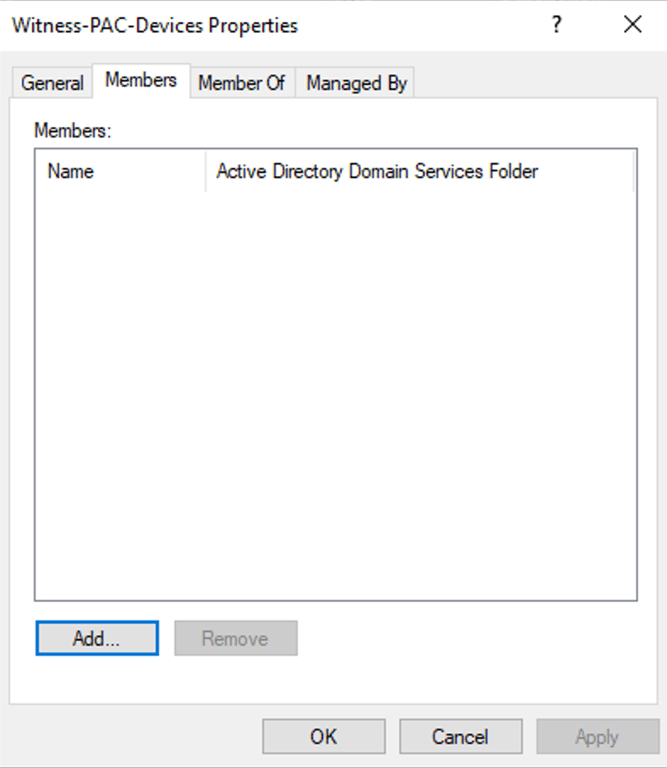
- Right-click the group, go to Properties > Members, Click on Object Types and select Computers. Then find and add required windows devices which need to be onboarded to Witness Anywhere Solution..

- Place the registration and flush script in a network share that is accessible by the devices or place it in the Sysvol scripts path as given below.
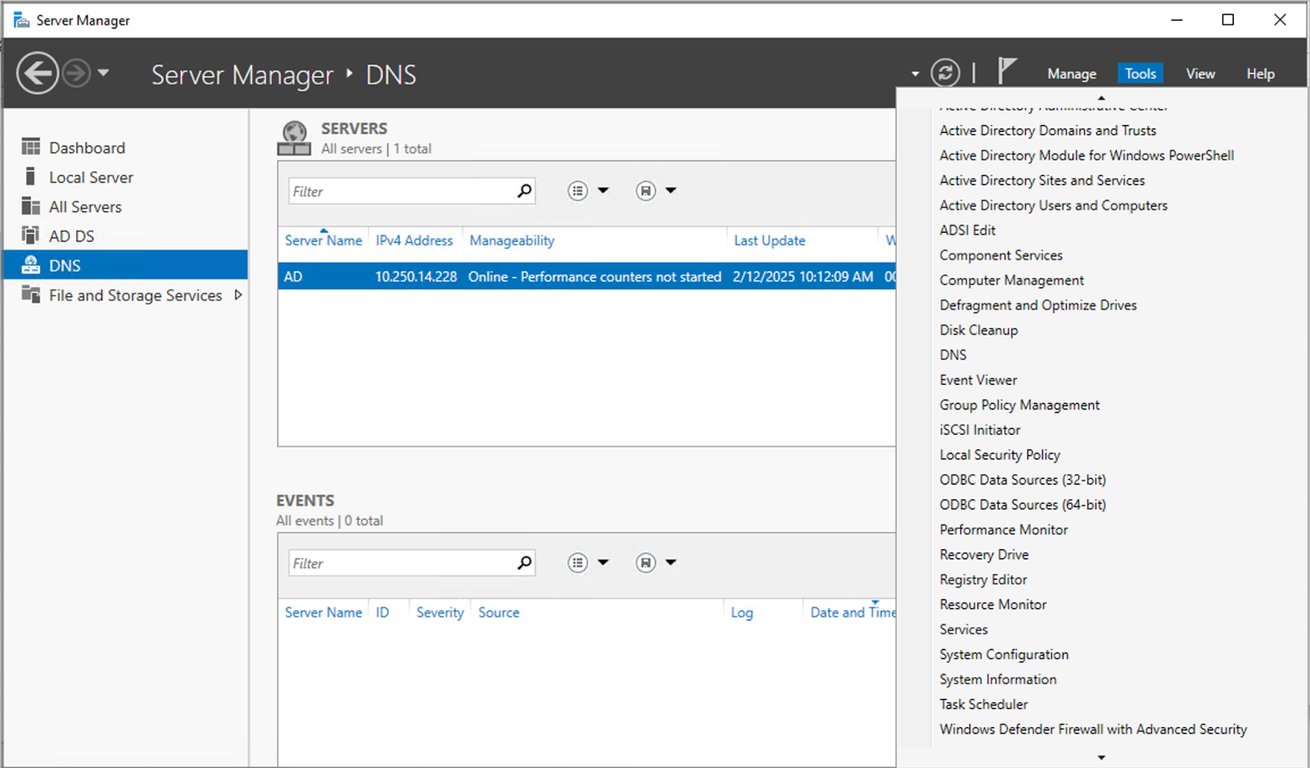
- Open Group Policy Management:
Ex: \\witness.lab\SysVol\witness.lab\scripts\
- Go to Administrative Tools > Group Policy Management.
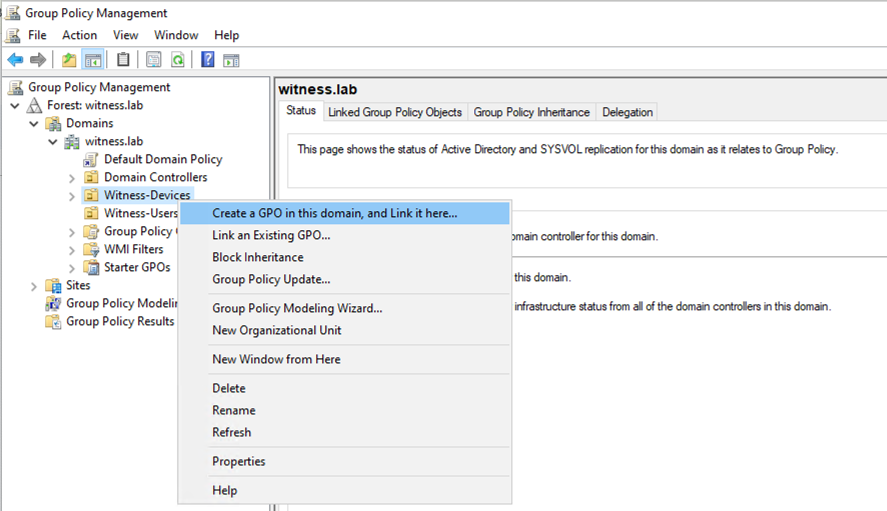
- Create a New GPO:
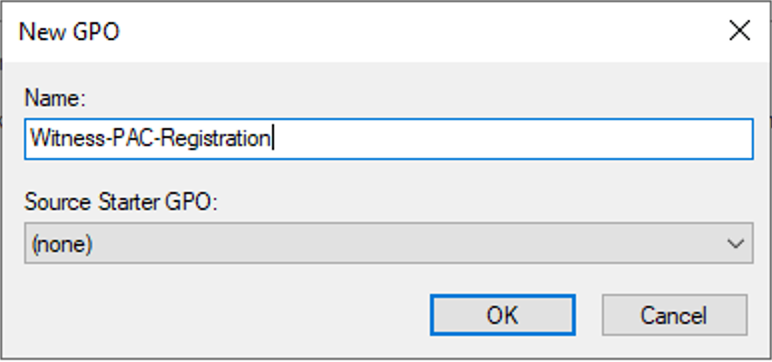
- Right-click the domain or OU, click “Create a GPO in this domain, and Link it here…”, name the GPO (e.g., “Witness-PAC-Registration”), and click OK.
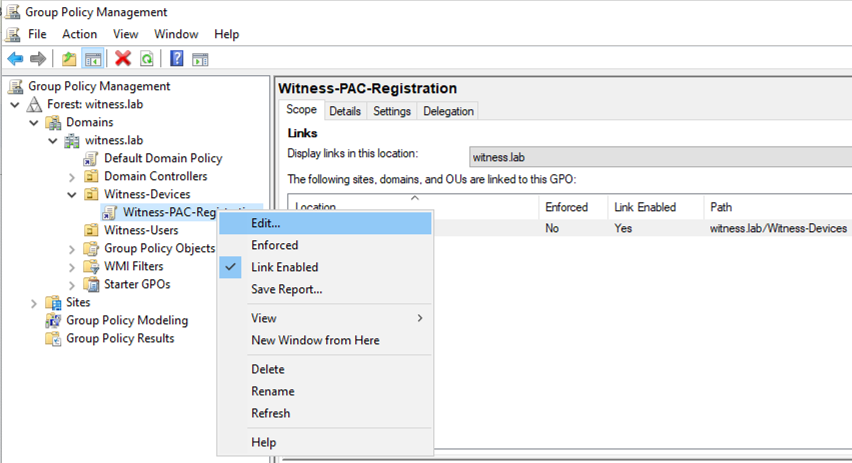
- Edit the GPO:
- Right-click the GPO, select Edit, and navigate to:
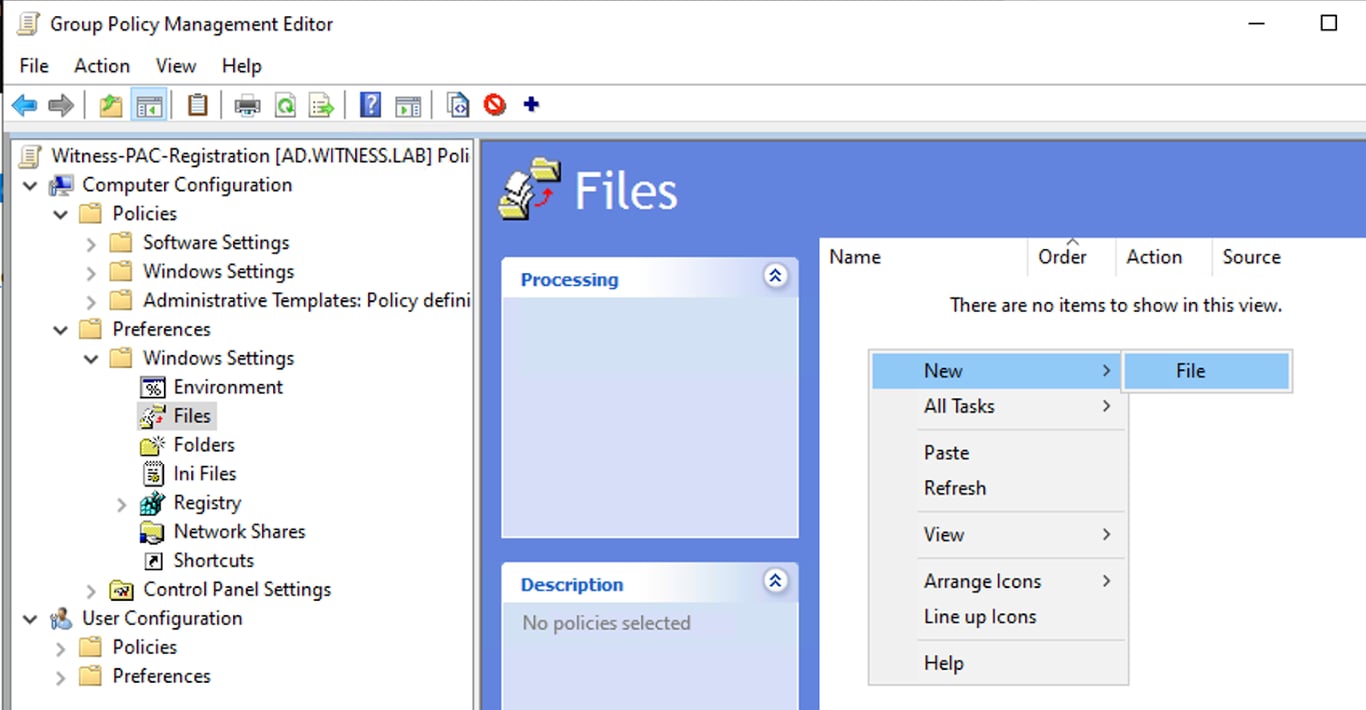
- Computer Configuration > Preferences > Windows Settings > Files
- Right Click and Select New > File
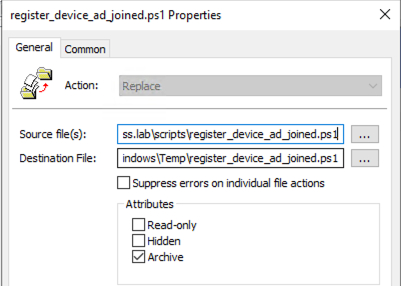
- Set the action as Replace
- Set the source file as the Network share path where the script is stored.
- Set the Destination file as C:\Windows\Temp\register_device_ad_joined.ps1
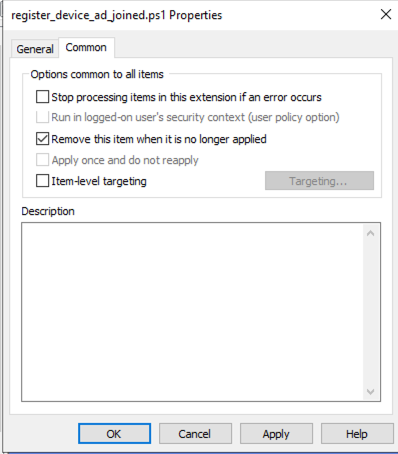
- Select the Common Tab and Enable the “Remove this item when it is no longer applied” checkbox.
- Click Apply and then OK.
\\witness.lab\SysVol\witness.lab\scripts\register_device_ad_joined.ps1
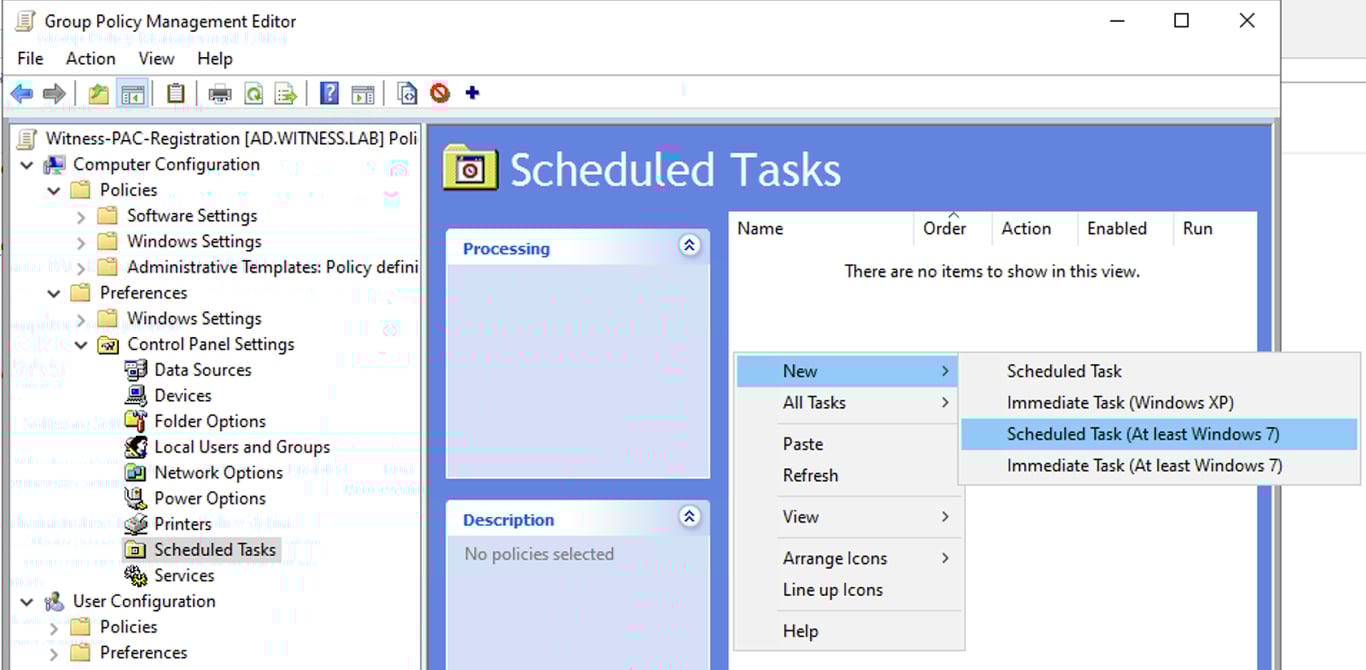
- Next, navigate to Computer Configuration > Preferences > Control Panel Settings > Scheduled Tasks
- Right click and select New > Scheduled Task (At least Windows 7)
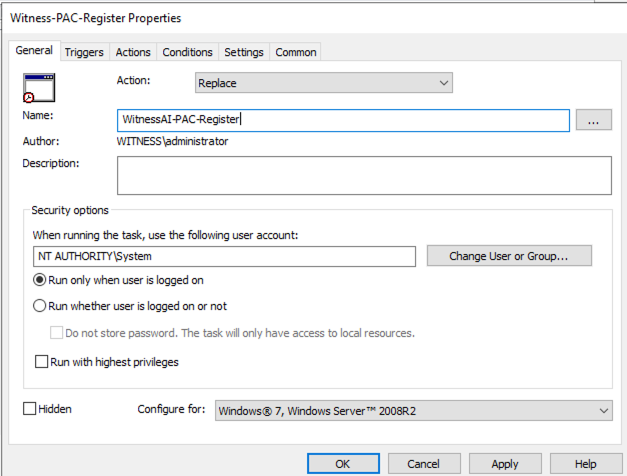
- In the new Task Window
- Select the Action as Replace
- Give the name as WitnessAI-PAC-Register
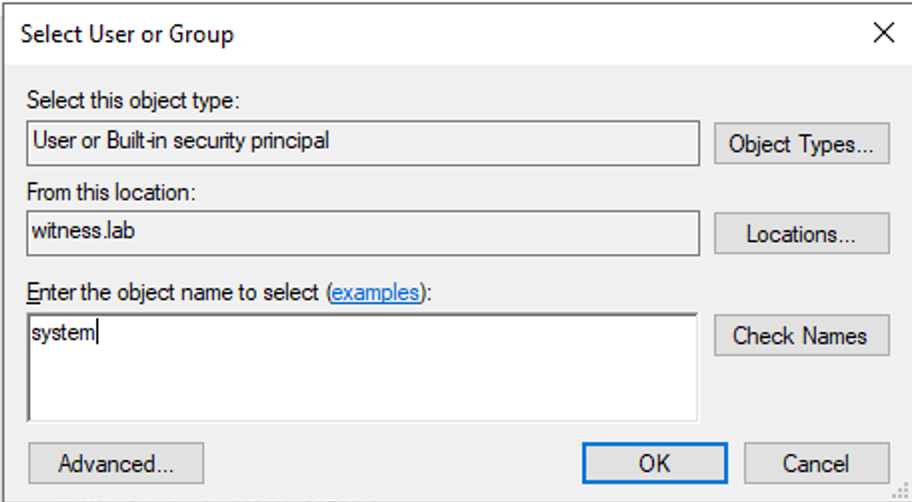
- Click on Change User or Group
- Type in System as the object name and click Check Names.
- Then click OK.
(NOTE: If you use a different, make sure that your task name starts with WitnessAI)
- Select the Configure For value as Windows 7, Windows Server 2008R2
- Select the Trigger Tab, and click on New.
- Select the value for Begin the Task as At log on and click OK
Note: Begin the Task value can be set as At task creation/modification as well if the registration script needs to be run immediately as soon as the GPO is applied. But this method makes troubleshooting difficult in case the PAC registration is failing due to any reason, as to re-run the registration script, a GPO update or scheduled task removal on device locally as an administrator would be required..
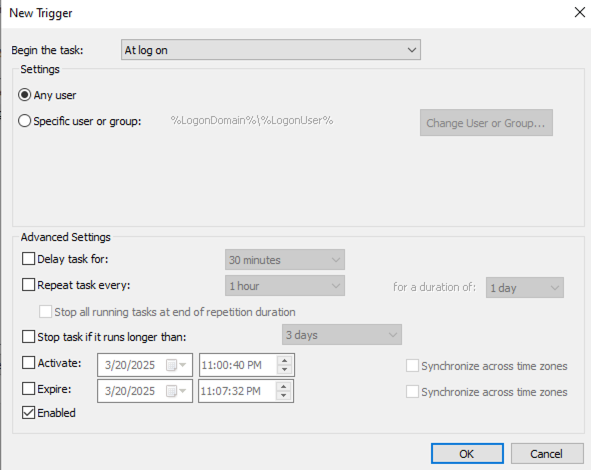
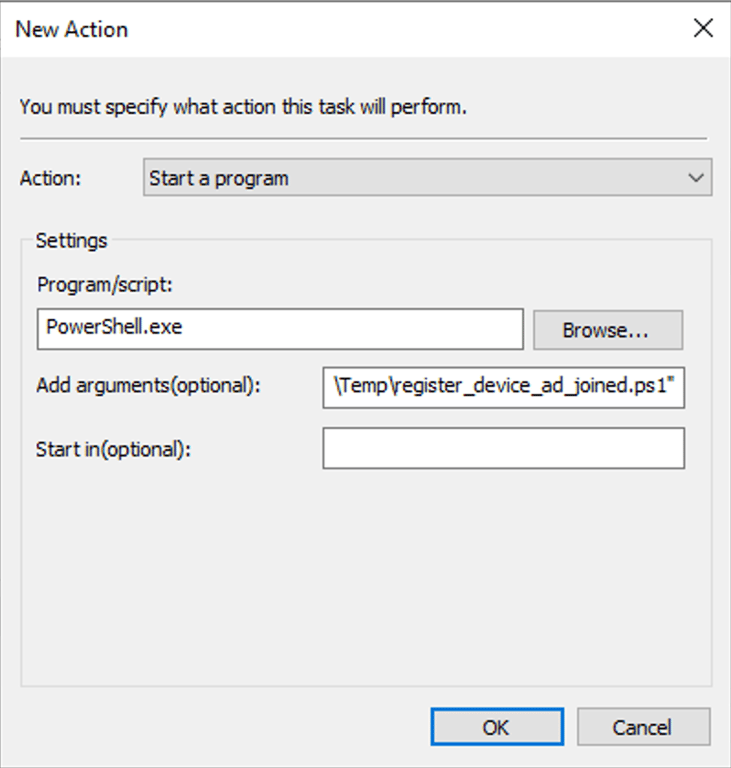
- Select on the Actions Tab and click on New.
- Enter the Program/Script value as PowerShell.exe
- Enter the Add Arguments Filed as -ExecutionPolicy Bypass -command "&C:\Windows\Temp\register_device_ad_joined.ps1"
- Click OK.
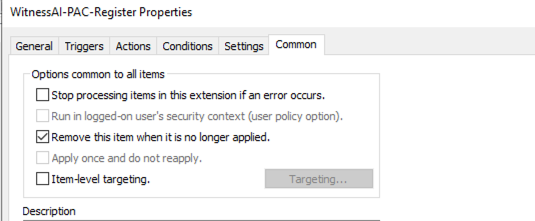
- Click on the Common Tab and Enable the “Remove this item when it is no longer applied” checkbox.
- Finally Click Apply and then OK.
- In the Witness-PAC-Registration GPO, Under Security Filtering:
- Remove Authenticated Users
- Add the Witness-PAC-Devices Security Group.
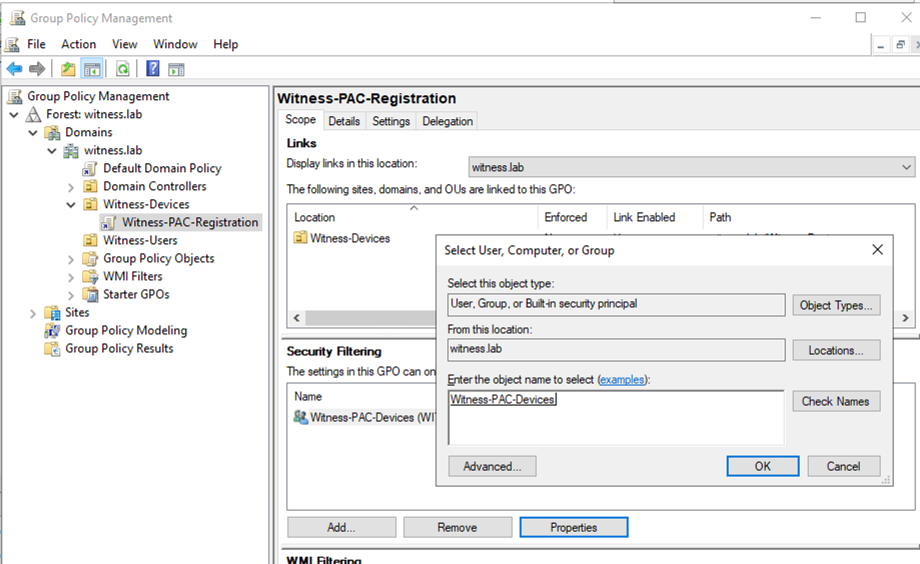
- The GPO will be applied during the next GPO refresh interval and the Registration will happen during the next user log on event.
To update the GPO immediately, On the Client Machine:
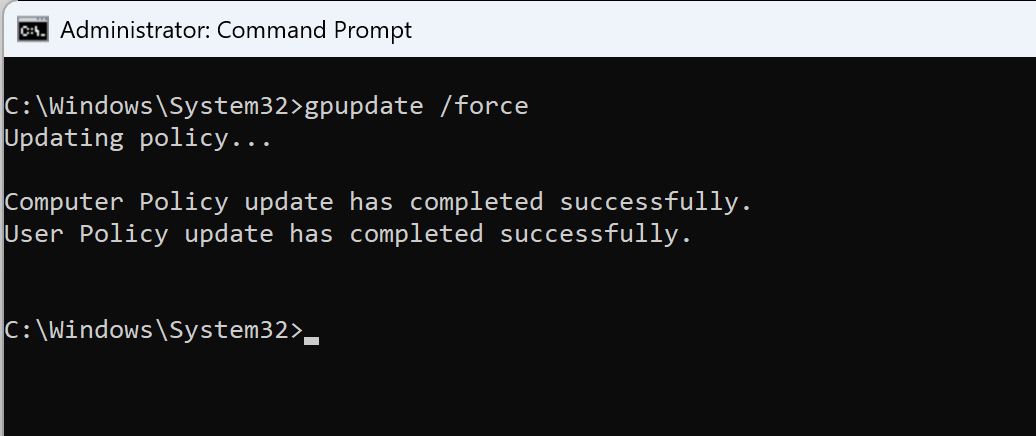
- Open Command Prompt as admin, and run the command:
gpupdate /force
- Test the Configuration:
- Restart the client machine to confirm the registration script runs.
- If the registration script ran successfully:
- The PAC URL should be applied under Proxy Settings.
- The Registry Key Computer\HKEY_CURRENT_USER\Software\WitnessAI should be created.
- If the PAC URL/Registry Key is not seen check the logs at
C:\Windows\Temp\pac-registration-log.txt
- After the PAC registration is confirmed, remove the devices from the Security Group (WitnessAI-PAC-Devices) as the GPO does not need to be applied once the registration is completed.
In case the GPO is not removed, during the subsequent device restarts the script will identify that the Device is already registered and will exit.
Debugging
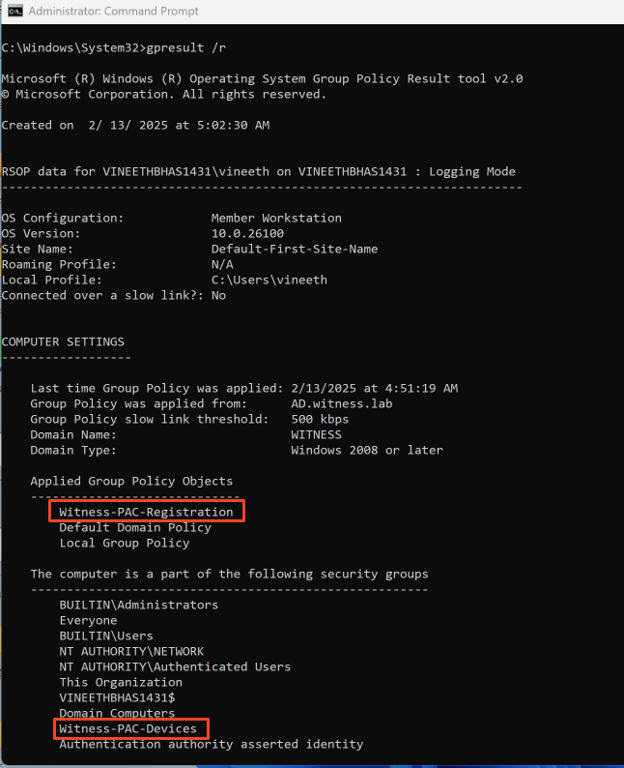
- To verify if the GPO was applied to the device, Open a command prompt as Admin on the client machine and run the command gpresult /r
If the GPO is applied successfully it should show up under the “Applied Group Policy Objects” section.
- Once the GPO is applied on the device, at the next device restart the script will be run automatically and the registration should happen.
- If the PAC Registration is successful, the script will create a registry key to store the Device Fingerprint and PAC URL under Computer\HKEY_CURRENT_USER\Software\WitnessAI
- Since the registration script is executed directly on the client machine, the output and results are not captured on the Active Directory. Therefore, all console outputs, including logs and error messages, will be saved locally on the client machine within the C:\Windows\Temp\pac-registration-log.txt file.
- Common Errors
- DNS Resolution Errors for Registration URL
- Connectivity Issues towards the Registration Server (tcp/443 connection failure)
- Invalid or expired PAC Token. (Error Code: 403)
- Username Validation Failure (Username not present in Console User List/DB)
- Invalid User/Device Fingerprinting data inputs (Error: Deserialization Error / Validation Error / Schema Error)
- In the Scheduled Task method, the registration script will be copied to C:\Windows\Temp\register_device_ad_joined.ps1 once the GPO is applied successfully.
- If the file is missing even after the GPO is applied successfully, check the System Logs under Windows Event Logs to understand why the file copy is failing.
- If the source file path specified in the GPO is not accessible by the device, this issue might arise.
- Make sure that the device is a member of the Witness-PAC-Devices Security Group which is used as the Security Restriction for this GPO.
If the file is not available in this path, the registration will not happen during the next reboot.
PAC Flush
- PAC configuration can be flushed by removing the device from the security group used for pushing the registration script and adding it to another group used for pushing the Flush script during startup.
Configuration
- Create a Security Group which contains all the devices intended for PAC Flush as mentioned in Step 1.
- Create a Security Group which contains all the devices intended for PAC distribution.
- Open Active Directory Users and Computers.
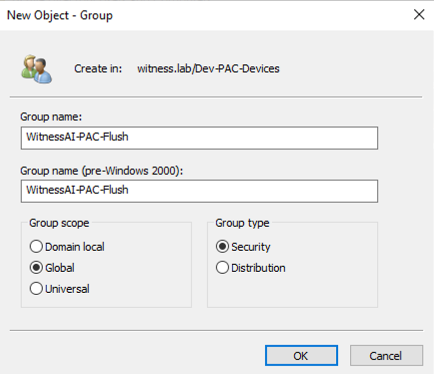
- Right-click the desired OU or container, select New > Group.
- Name the group (ex: "WitnessAI-PAC-Flush").
- Set Group Scope to Global and Group Type to Security.
- Click Ok
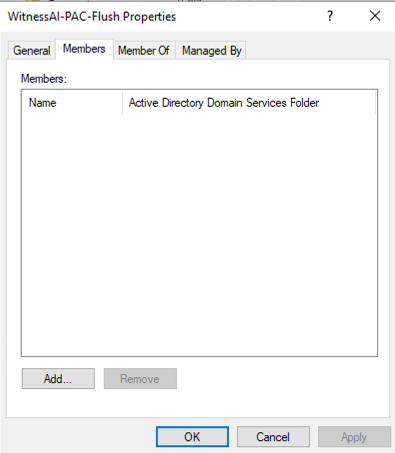
- Right-click the group, go to Properties > Members, Click on Object Types and select Computers. Then find and add required windows devices which need to be onboarded to Witness Anywhere Solution..
Name it "PAC-Flush-Devices"
Note: Ensure that these devices are first removed from the Security Group used for the PAC Registration GPO (WitnessAI-PAC-Devices).
- Open Group Policy Management:
- Go to Administrative Tools > Group Policy Management.
- Create a New GPO:
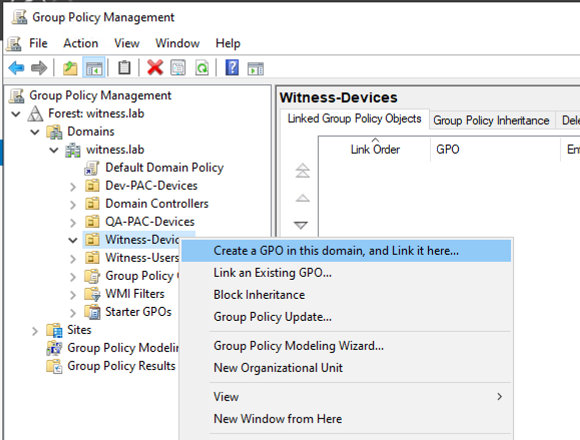
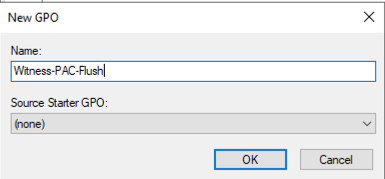
- Right-click the domain or OU, click “Create a GPO in this domain, and Link it here…”, name the GPO (e.g., “Witness-PAC-Flush”), and click OK.
- Edit the GPO:
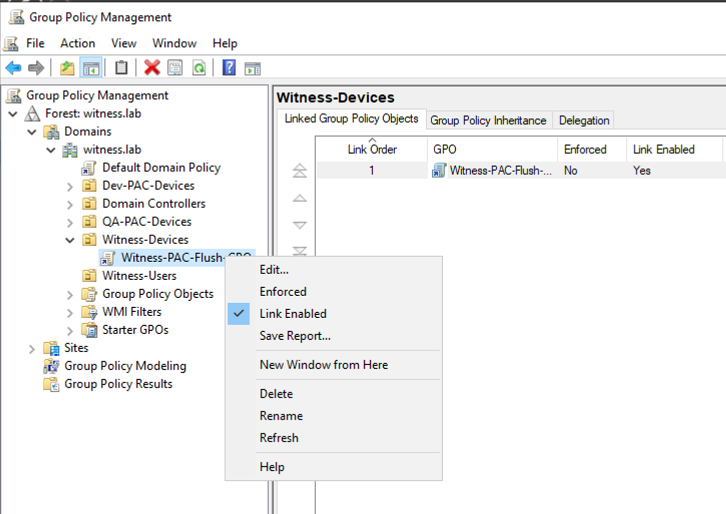
- Right-click the GPO, select Edit, and navigate to:
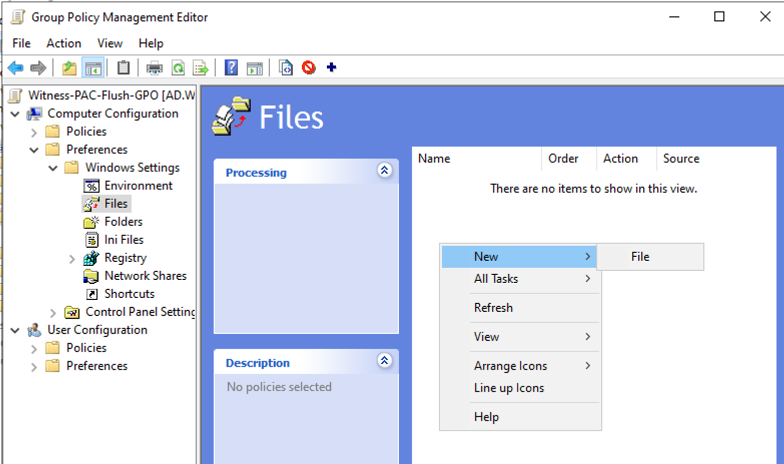
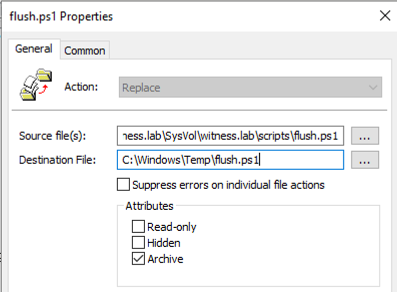
- Computer Configuration > Preferences > Windows Settings > Files
- Right Click and Select New > File
- Set the action as Replace
- Set the source file as the Network share path where the Flush script is stored in Step 2 of Registration.
- Set the Destination file as C:\Windows\Temp\flush.ps1
- Select the Common Tab and Enable the “Remove this item when it is no longer applied” checkbox.
- Click Apply and then OK.
\\witness.lab\SysVol\witness.lab\scripts\flush.ps1
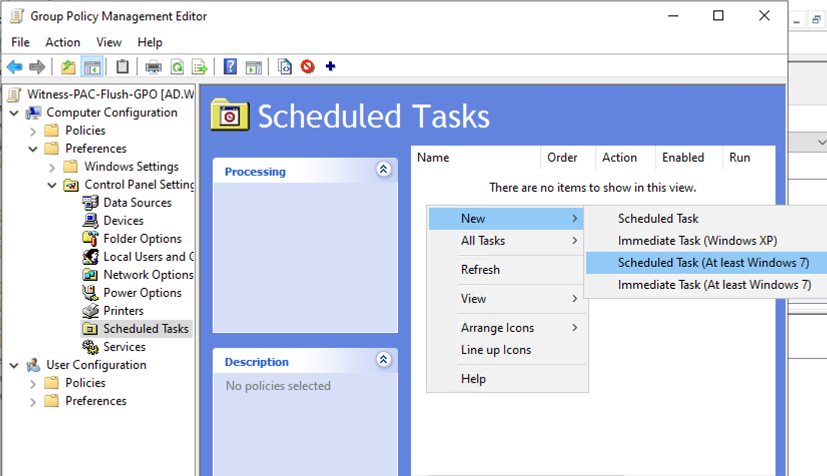
- Next, navigate to Computer Configuration > Preferences > Control Panel Settings > Scheduled Tasks
- Right click and select New > Scheduled Task (At least Windows 7)
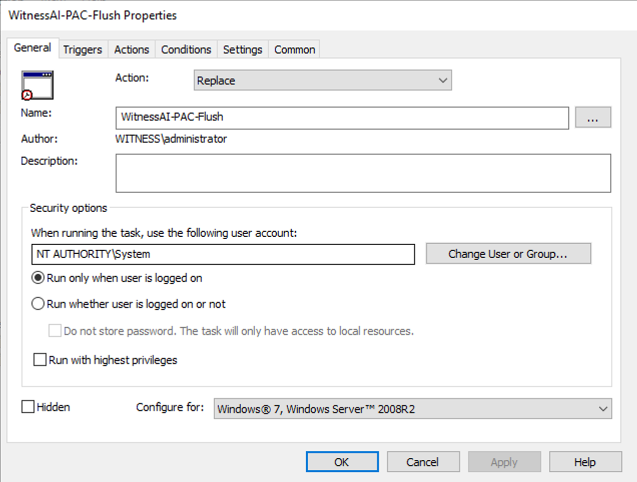
- In the new Task Window
- Select the Action as Replace
- Give the name as WitnessAI-PAC-Flush
- Click on Change User or Group
- Type in System as the object name and click Check Names.
- Then click OK.
- Select the Configure For value as Windows 7, Windows Server 2008R2
(NOTE: If you use a different, make sure that your task name starts with WitnessAI)
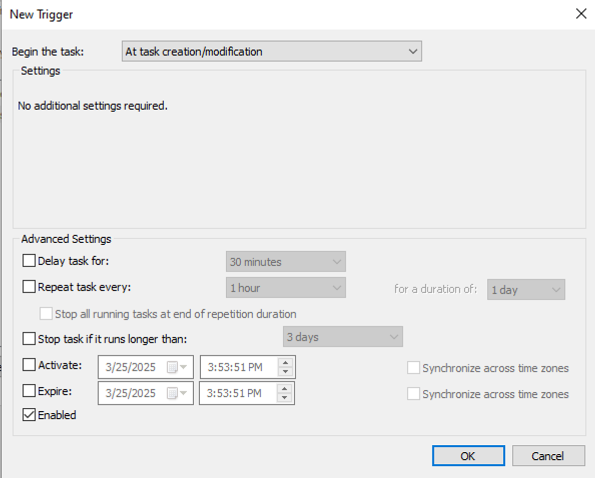
- Select the Triggers Tab, and click on New.
- Select the value for Begin the Task as At task creation/modification and click OK
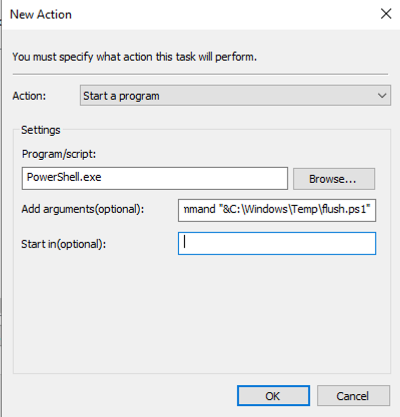
- Select on the Actions Tab and click on New.
- Enter the Program/Script value as PowerShell.exe
- Enter the Add Arguments Filed as -ExecutionPolicy Bypass -command "&C:\Windows\Temp\flush.ps1"
- Click OK.
- Click on the Common Tab and Enable the “Remove this item when it is no longer applied” checkbox.
- Finally Click Apply and then OK.
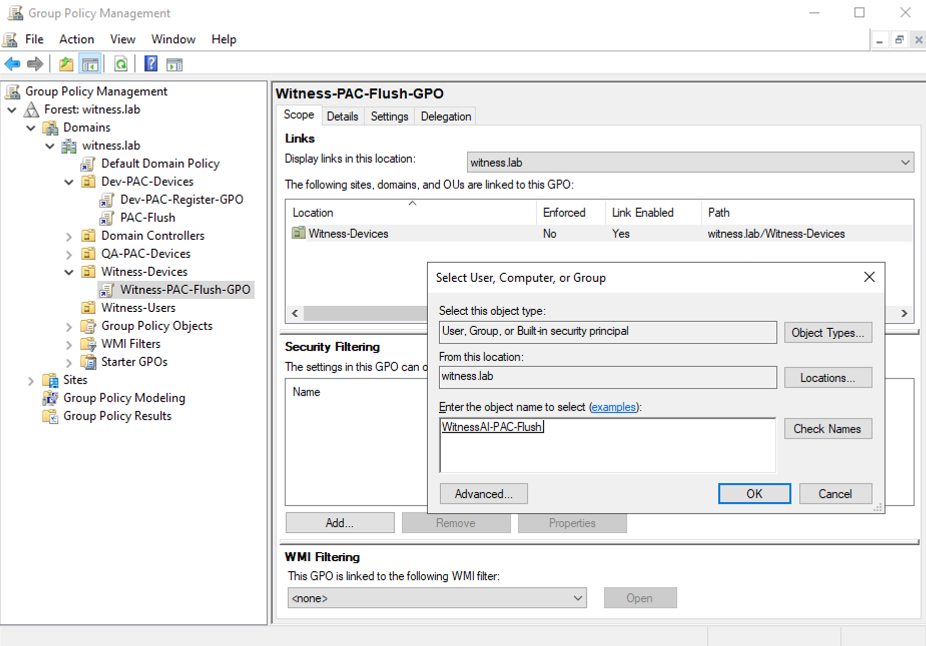
- In the Witness-PAC-Flush GPO, Under Security Filtering:
- Remove Authenticated Users
- Add the Witness-PAC-Flush Security Group.
- The flush script will run as soon as the GPO is applied during the GPO sync and will remove all PAC configurations.
A reboot is not required for the Flush script to run as the task is scheduled to run at Task creation.